Zoho CRM Managing Web Tabs
Web tabs help you to open web pages like company-wide announcements, web applications, etc. inside Zoho CRM. All the Zoho CRM users across the organization can view these web tabs. You can also create your own applications using Zoho Creator and access them inside Zoho CRM. By default, the web tabs functionality is available only to the users with Administrator privilege. However, you can also activate this functionality for other users.
Activate Web Tabs
Using the Web Tabs functionality you can create web tabs and access web applications or Zoho Creator applications through it. By default, only users with Administrator privilege can create, edit or delete web tabs. However, you can activate this functionality for other users also.
To activate web tabs for users
- Log in to Zoho CRM with Administrator privilege.
- Go to Setup > Users & Control > Security Control > Profiles.
- In the Profiles page, click on the profile for which you want to give access.
- In the Profile Details page, click Edit.
- Select the Customize Zoho CRM check box under Admin Permissions.
- Click Save.
Create web tabs
By default, only users with Administrator's privilege can create web tabs. However,users with Customize Zoho CRM permission enabled can also have access to the web tab functionality. You can create a maximum of 25 tabs, each with a unique name.
To create web tabs
- Go to Setup > Customization > Modules and Fields > Web Tabs.
- In the Web Tabs page, click Create Web Tab.
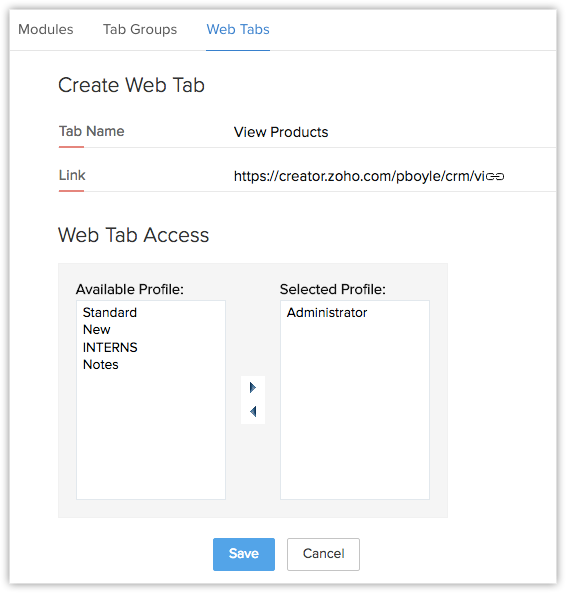
- Enter the name of the web tab in Tab Name box.
- Enter the URL in the Link box.
- Select the profiles from the list to provide access to the web tab.
- Click Save.

- The web tabs that you create will not be linked to the other modules in Zoho CRM.
If you delete a web tab, data in the other modules will not be affected. - You cannot create tabs with the same name as that of the existing modules in Zoho CRM (eg. Leads, Potentials, Reports, etc.).
- You may not be able to add some third-party web pages in the web tab. These websites restrict their content from loading inside another websites to avoid clickjacking attacks. They use the X-Frame-Options HTTP response header to indicate whether or not a browser should be allowed to render a page in an iframe.
Access Zoho Creator applications in Zoho CRM
With the Web Tab functionality, you can now access applications, that are designed using Zoho Creator, within your Zoho CRM account. For instance, you can create an application that lists outs the major announcements or latest events in your organization, or forms that calculate the sales commission, keeps track of travel expenses and marketing budget. To access Creator applications within Zoho CRM, you need to first create an application using Zoho Creator. Then, you can create web tabs with the link for the Creator application.
Part 1 - To create applications using Zoho Creator, see Zoho Creator Help
Part 2 - To create web tabs with the Creator application link
- Go to Setup > Customization > Modules and Fields > Web Tabs.
- In the Web Tabs page, click Create Web Tab.
- Click
 (Choose a form from Zoho Creator link) to choose an application from Zoho Creator.
 - In the Creator Form Details page, click on the required application.The name of the applicat ion/form will be automatically available in the Tab Name field.
- Select the profiles from the list to provide access to the web tab.
- Click Save.
The application will be accessible in CRM as a new tab.
Delete Web Tabs
As an administrator, you can delete the unwanted web tabs that are no more in use and create new ones to access various Creator applications in Zoho CRM.
To delete web tabs
- Go to Setup > Customization > Modules and Fields > Web Tabs.
- In the Web Tabs page, click the Delete icon corresponding to the web tab that you want to delete.
- In the confirmation dialog box, click Delete.
Related Articles
Zoho CRM Managing Multiple CRM Organizations
Access multiple CRM accounts using one sign-in Zoho CRM allows users to access multiple organizational (CRM) accounts using the same email address. This is especially useful for organizations that maintain different CRM accounts to manage their ...Managing services with Zoho CRM
Services such as consultation, home cleaning, repair and maintenance, pickup and delivery, and salon or spa appointments are time-bound activities that take place every day, often with different customers. Customers often re-request the same service ...Zoho CRM Managing CRM Account Settings
Once you sign up for Zoho CRM and have your own account, you can personalize your CRM account. By default, the mandatory information provided by you at the time of sign up, is automatically updated. After logging in, you can change these details ...Zoho CRM Managing Zoho Account Settings
In Zoho Accounts, the mandatory fields under the Personal information section are set to default as soon as you register with any Zoho service. After logging in, you can change the information according to your preference. When you change certain ...Zoho CRM Managing List Views
A List View is grouping of records based on a defined set of criteria. List Views are beneficial for displaying customer specific data according to your business requirements. For example, you may be interested in following-up on the leads created ...